این روش بیشتر برای مینی کامپیوترهای جدید ایسوس کاربرد دارد اما برای هر کامپیوتری قابل اجراست. در صورتی که به هر دلیلی نمیتوانید از سی دی یا دی وی دی ویندوز ایکس پی بهره ببرید، این روش راهی مناسب برای حل مشکل شما می باشد.
برای این کار شما حتما باید یک نسخه ی 32 بیتی از ویندوز ویستا یا ایکس پی بر روی کامپیوتر خود داشته باشید(منظور سیستم عاملی است که در آن یو اس بی خود را آماده میکنید). مواد مورد نیاز
برای این کار شما حتما باید یک نسخه ی 32 بیتی از ویندوز ویستا یا ایکس پی بر روی کامپیوتر خود داشته باشید(منظور سیستم عاملی است که در آن یو اس بی خود را آماده میکنید). مواد مورد نیاز
USB_PREP8 (alternative download)
PeToUSB (alternative download)
Bootsect.exe (alternative download)
PeToUSB (alternative download)
Bootsect.exe (alternative download)
Installing Windows XP on the Asus EEE pc using a single USB flash drive.

Please note this tutorial works on all computers not just the Asus EEE PC.
To complete this tutorial you need a 32bit version of Windows XP or Windows Vista installed on your home PC.
What you'll need:
USB_PREP8 (alternative download)
PeToUSB (alternative download)
Bootsect.exe (alternative download)
Special Note: If you use the program Nlite be sure to keep the manual installation files as the USB_prep8 script relies on these files.
Extract the files in Bootsect.zip
The next step is to extract USB_prep8 and PeToUSB.
Next copy the PeToUSB executable into the USB_prep8 folder.
Inside of the USB_prep8 folder double click the executable named usb_prep8.cmd.
The window that opens will look like this:
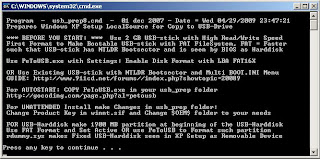 Press any key to continue
You next window will look like this: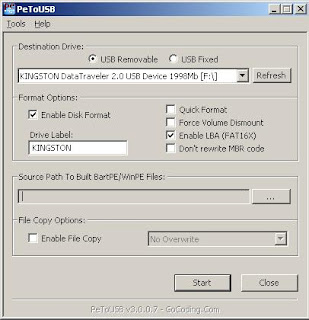 These settings are preconfigured for you all you need to do now is click start.
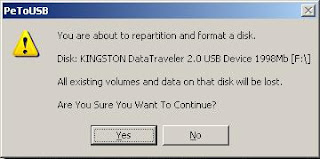 Click Yes and go on ...
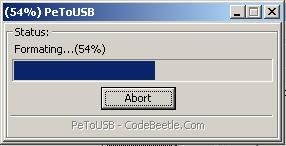
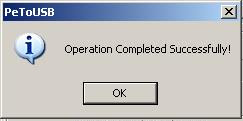 Once the format is complete DO NOT close the window just leave everything as it is and open a command prompt from your start menu (type cmd in the search bar or run box depending on your version of windows.).
Inside of the command windows go to the directory you have bootsect.exe saved.
(use the cd directoryname command to switch folders)
Now type "bootsect.exe /nt52 F:" NOTE F: is the drive letter for my USB stick if yours is different you need to change it accordingly. What this part does is write the correct boot sector to your USB stick, this allows your PC to boot from the USB stick without it nothing works.
Please note: When running the bootsect.exe command you cannot have any windows open displaying the content of your USB stick, if you have a window open bootsect.exe will be unable to lock the drive and write the bootsector correctly.
If all went well you should see "Bootcode was successfully updated on all targeted volumes."(screen shot below)
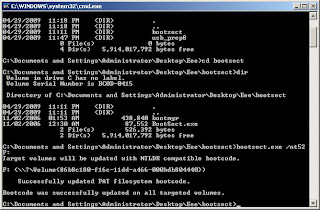 Now you can close this command prompt (don't close the usbprep8 one by mistake) and the petousb window.
You window you see now should look like this:
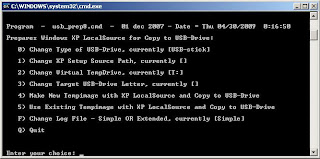
Mine looked like this : (T: as temp drive, F: as my USB and the XP directory as I:\, which was a virtual drive)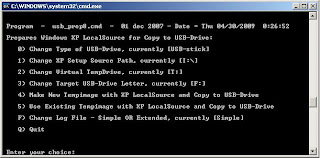 If it doesn't try pressing enter.
Now you need to enter the correct information for numbers 1-3.
Press 1 and then enter. A folder browse window will open for you to browse to the location of you XP setup files (aka your cdrom drive with xp cd in)
Press 2 and enter a letter not currently assigned to a drive on your PC
Press 3 and enter the drive letter of your USB stick
Press 4 to start the process.
The script will ask you if its ok to format drive T:. This is just a temp drive the program creates to cache the windows installation files. Press Y then enter.
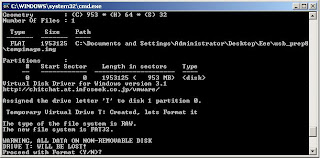 Once it's done formating press enter to continue again
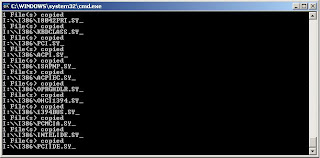
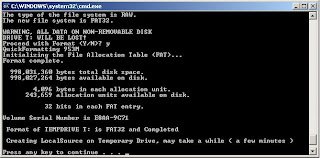 You can now see the program copying files to the temp drive it created. Once this is done press enter to continue again.
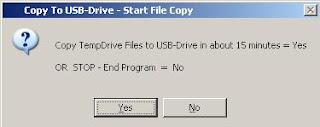
 Next you will see a box pop up asking you to copy the files to USB drive yes/no you want to click yes.
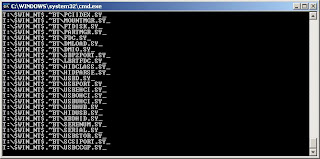
 and then you will observe copying operation ...
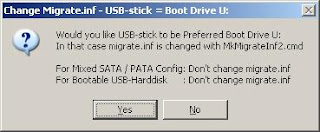
 Once the script has completed copy files a popup window asking if you would like to USB drive to be preferred boot drive U: select YES on this window.
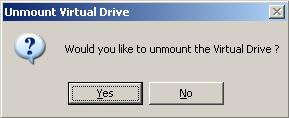
 Now select yes to unmount the virtual drive.
 Ok we are done the hard part, close the usbprep8 window.
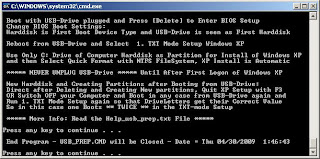 Now make sure your EEE pc is configured with USB as the primary boot device.
Insert your USB drive and boot up the EEE.
On the startup menu you have two options, select option number 2 for text mode setup.
From this point on it is just like any other windows XP installation delete/recreate the primary partition on your EEE pc and format it using NTFS. Make sure you delete ALL partitions and recreate a single partition or you will get the hal.dll error message.
Once the text mode portion of setup is complete it will boot into the GUI mode (you can press enter after the reboot if your too excited to wait the 30 seconds)
Once the GUI portion of setup is complete you will again have to boot into GUI mode this will complete the XP installation and you will end up at you XP desktop. It is very important that you DO NOT REMOVE THE USB STICK before this point. Once you can see your start menu it is safe to remove the usb stick and reboot your pc to make sure everything worked.
This method has advantages over all current no cdrom methods of installing XP to the EEE. You do not have to copy setup files in DOS to the SSD and install from there. It gives you access to the recovery console by booting into text mode setup, and it gives you the ability to run repair installations of XP if you have problems later on.
I hope this worked out for you and please post feedback to the comments section.
Please note due to the amount of comments this article has received you must now click on "Post a Comment" below the existing comments to view the most recent feedback in a popup window.
Learnt at this Source but implemented for 1000HE with extera notes that you should take care of for this version by ME

Please note this tutorial works on all computers not just the Asus EEE PC.
To complete this tutorial you need a 32bit version of Windows XP or Windows Vista installed on your home PC.
What you'll need:
USB_PREP8 (alternative download)
PeToUSB (alternative download)
Bootsect.exe (alternative download)
Special Note: If you use the program Nlite be sure to keep the manual installation files as the USB_prep8 script relies on these files.
Extract the files in Bootsect.zip
The next step is to extract USB_prep8 and PeToUSB.
Next copy the PeToUSB executable into the USB_prep8 folder.
Inside of the USB_prep8 folder double click the executable named usb_prep8.cmd.
The window that opens will look like this:
 Press any key to continue
You next window will look like this:
 These settings are preconfigured for you all you need to do now is click start.
 Click Yes and go on ...
 Once the format is complete DO NOT close the window just leave everything as it is and open a command prompt from your start menu (type cmd in the search bar or run box depending on your version of windows.).
Inside of the command windows go to the directory you have bootsect.exe saved.
(use the cd directoryname command to switch folders)
Now type "bootsect.exe /nt52 F:" NOTE F: is the drive letter for my USB stick if yours is different you need to change it accordingly. What this part does is write the correct boot sector to your USB stick, this allows your PC to boot from the USB stick without it nothing works.
Please note: When running the bootsect.exe command you cannot have any windows open displaying the content of your USB stick, if you have a window open bootsect.exe will be unable to lock the drive and write the bootsector correctly.
If all went well you should see "Bootcode was successfully updated on all targeted volumes."(screen shot below)
 Now you can close this command prompt (don't close the usbprep8 one by mistake) and the petousb window.
You window you see now should look like this:

Mine looked like this : (T: as temp drive, F: as my USB and the XP directory as I:\, which was a virtual drive)
 If it doesn't try pressing enter.
Now you need to enter the correct information for numbers 1-3.
Press 1 and then enter. A folder browse window will open for you to browse to the location of you XP setup files (aka your cdrom drive with xp cd in)
Press 2 and enter a letter not currently assigned to a drive on your PC
Press 3 and enter the drive letter of your USB stick
Press 4 to start the process.
The script will ask you if its ok to format drive T:. This is just a temp drive the program creates to cache the windows installation files. Press Y then enter.
 Once it's done formating press enter to continue again
 You can now see the program copying files to the temp drive it created. Once this is done press enter to continue again.
 Next you will see a box pop up asking you to copy the files to USB drive yes/no you want to click yes.
 and then you will observe copying operation ...
 Once the script has completed copy files a popup window asking if you would like to USB drive to be preferred boot drive U: select YES on this window.
 Now select yes to unmount the virtual drive.
 Ok we are done the hard part, close the usbprep8 window.
 Now make sure your EEE pc is configured with USB as the primary boot device.
Insert your USB drive and boot up the EEE.
On the startup menu you have two options, select option number 2 for text mode setup.
From this point on it is just like any other windows XP installation delete/recreate the primary partition on your EEE pc and format it using NTFS. Make sure you delete ALL partitions and recreate a single partition or you will get the hal.dll error message.
Once the text mode portion of setup is complete it will boot into the GUI mode (you can press enter after the reboot if your too excited to wait the 30 seconds)
Once the GUI portion of setup is complete you will again have to boot into GUI mode this will complete the XP installation and you will end up at you XP desktop. It is very important that you DO NOT REMOVE THE USB STICK before this point. Once you can see your start menu it is safe to remove the usb stick and reboot your pc to make sure everything worked.
This method has advantages over all current no cdrom methods of installing XP to the EEE. You do not have to copy setup files in DOS to the SSD and install from there. It gives you access to the recovery console by booting into text mode setup, and it gives you the ability to run repair installations of XP if you have problems later on.
I hope this worked out for you and please post feedback to the comments section.
Please note due to the amount of comments this article has received you must now click on "Post a Comment" below the existing comments to view the most recent feedback in a popup window.
Learnt at this Source but implemented for 1000HE with extera notes that you should take care of for this version by ME

